WAITER ECC - GENERAL
The Waiter ECC is designed specifically so its wiring, connectors, A/C and furnace interfaces, and control logic are essentially a drop in, plug and play replacement for the Intellitec control system.
HOWEVER, we’re interesting in creating a solution for other systems and would like to hear from you. If there is enough interest, we’d move forward with expanding the Waiter ECC line to include other control systems.
Absolutely. We designed a REMOTE touch screen that can be mounted anywhere that’s within range of the WaiterControl WiFi access point (the main touchscreen). It uses the same hardware and software as the main touchscreen, so it has the same pages and screens as the main unit.
The REMOTE unit can be mounted on a wall using a slide mount that allows it to be easily removed. Or it can rest on a countertop. It must be located within wifi distance of the main unit. It operates on 12 volts or can plug into a 120 wall outlet using the enclosed wall plug power supply. See REMOTE DISPLAY
YES / NO:
NO – To make the Waiter ECC system simple to install and plug and play compatible, we designed our system as a stand alone computer system, with a dedicated operator touchscreen, no applications to download or install, no networks to log onto, no systems to pair, no passwords to remember, no monthly fees for wireless services, etc, etc. You just plug it in, and it works,
YES – By designing the Waiter ECC system around a dedicated WiFi network using MQTT communications protocol, we’ve opened up the design to infinite possibilities to connect external devices that can monitor and control the Waiter ECC system. The dedicated WiFi Access Point and MQTT messaging is well documented in the TECHNICAL MANUAL. Several of our customers have created additional interfaces and are monitoring and controlling the system via home automation software like Node-RED, OpenHAB, HomeAssistant, etc
Absolutely; If you’re familiar with IoT and MQTT, then you have the basic knowledge on how the Waiter ECC communicates. The only restriction is, the controller circuit board is looking for a very specific SSID (WaiterControl) and a very specific IP address for the MQTT broker (192.168.50.10). These are currently hard coded in the controller card firmware. We anticipate changing this in the future so an end user can select their SSID and MQTT broker addresses, but for now, this was the simplest, most reliable way of ensuring wifi connectivity between the controller board and the operator touchscreen.
Download the TECHNICAL MANUAL. It has much detail, including the MQTT topic and payload structure for the communications.
Absolutely NOT. While designing the WaiterECC system, we knew many installations wouldn’t have access to an internet connection, so we created our own dedicated WiFi access point (AP) that doesn’t require an internet connection.
The Waiter ECC touch screen computer serves as a dedicated WiFi network AP for the sole purpose of allowing Waiter ECC control modules to connect to it without any wiring. The WiFi network is named WaiterControl or WaiterControl2.
EXAMPLE:
The main control module connects to the WaiterControl WiFi network. This is how it communicates back and forth with the touchscreen.
Our REMOTE touch screen automatically connects to the WaiterControl WiFi network, making it possible to have two fully functional touchscreens in the motorhome.
Optional control modules are currently in development and will also connect to the dedicated AP WiFi network. These control modules are currently in the works:
Leveler controller – We are currently developing a leveler controller that would control a Power Gear manual leveling system from the touch screen.
Generator controller – Start and stop the generator based on time, quite times, and to re-charge batteries based on voltage readings.
Water heater controller – allows control of the water heater temperature, turn it ON and OFF, Set schedules to change temperatures at different times of day.
Residential Refrigerator controller – Control compressor and defrost cycling, allow defrost cycle to be turned off, this is great for when boon-docking and need to conserve batteries.
Technically, yes, We don’t have a smartphone app for this and haven’t heard of anyone developing one yet.
The firmware in our Waiter ECC circuit board is hard coded to search for and log onto the WaiterControl SSID. It then connects to the MQTT broker at IP address 192.168.50.10. which is part of the Waiter ECC touchscreen computer.
If you wanted to use NodeRed, OpenHAB, HomeAssistant, or develop your own application, its simple, connect your device to wifi network WaiterControl, and point your MQTT application to the broker at 192.168.50.10. OR, add a bridge to connect the WaiterControl network to your regular home network that has your NodeRED, OpenHAB, or HomeAssistant applications.
If you don’t want to use the Waiter ECC touchscreen hardware, You could build a Rpi as a wifi access point with the SSID name of WaiterControl, install a MQTT broker at a static IP address of 192.168.50.10., and set up the DHCP server to provide the control module with an IP address. You could then connect the WaiterControl network to your other networks using a wifi bridge.
YES / NO. You said “Control Module”. The Waiter ECC control circuit board does not come with an enclosure. The circuit board in our kit is designed to replace the existing circuit board in the original Intellitec ECC enclosure. So to be specific, We don’t sell a “module” (our circuit board inside of an enclosure) , but we may sell the circuit board. Contact us by e-mail.
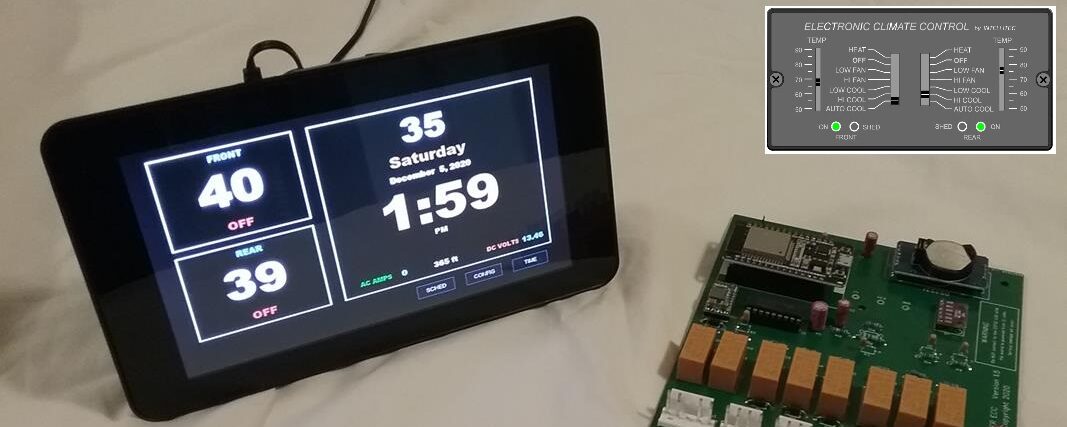
Our control board will not work with the Intellitec thermostat, nor will our touchscreen work with the Intellitec control board. The Waiter ECC kit (touchscreen and control board) is a plug and play replacement for the entire Intellitec system, the original wall thermostat and control board.
Generally, yes, we’ve shipped units outside the United States and haven’t run into any countries that forbid this product. HOWEVER: There will be additional fees associated with shipping, plus possible import duties, fees, and tariffs imposed by your country. Here’s your options:
1) We’ll bill you via a PayPal request for any additional shipping costs above the $35 we normally charge for U.S. shipping. PLUS, You need to provide us with a statement that you’ll be responsible for any import duties, fees, or tariffs that may be imposed. We can tell you in advance what the additional shipping costs will be, but have no way of finding out what, if any, import fees will be. If there are any import fees, your country will request payment from you when you receive the package, OR, they may send you a bill for the fees in your mail.
2) If you have an account with FedEx, UPS, USPS, etc. Create a shipper in your account and e-mail it to us. We’ll drop off the package at FedEx, UPS, or whatever, and you’ll pay for the entire shipping etc. We’ll refund the $35 shipping fee that you initially paid when you purchased the unit. Contact us for package size, weight, originating address, and contact information you’ll need, etc.
Yes you can. WaiterControl is the WiFi network access point that’s built into the main touchscreen. This network doesn’t have an “Internet” connection, it’s used solely for communication between the Waiter ECC control modules and the touchscreen. The control module, Remote display, and future optional modules all connect to this network so they can communicate with each other.
During testing and troubleshooting we often sign onto this network with our smartphones and use an android app called MyMQTT to monitor the MQTT messages that are being sent back an forth between the modules and the touchscreen. This is all described in detail in the TECHNICAL manual.
Over the years we’ve developed numerous software programs that make the Waiter ECC what it is; A plug-and-play solution to replace a failed Intellitec ECC system that requires no setup or intervention by the user; just plug it in and it works.
The software programs include; c++ firmware running in the control module. c# running as a windows DOT NET application on the Rpi under Linux. Python application running on the Rpi as a Bash job.
All of these programs communicate with each other via an communications protocol known as MQTT. We’ve published an interface document that describes the MQTT messages and topics used in these communications and the WiFi Access Point connection scheme with username, passwords, IP address, etc. This TECHNICAL DETAIL document should provide the technical savvy users with all the information they need to connect, monitor, and even control the Waiter ECC system. This was the main reason for using the MQTT protocol.
As for releasing our c++, C#, and Python code to open source, we don’t have any plans to do so at this time.
WAITER ECC - INSTALL
In the vast majority of installations, the installer mounts the touchscreen the same location as the original operator panel. This allows the two temperature sensor plugs and the yellow (+) and brown (-) wires to be plugged into the touchscreen.
If you’re mounting to a regular luan wall, consider using the optional wall mount plate to add strength and security for the touchscreen installation.
If you’re mounting to a large black control panel surface, you may benefit from mounting the touchscreen upside down, See this article.
Note that if you wish to have a touchscreen at another location, a REMOTE DISPLAY is available.
The Waiter ECC re-uses the enclosure from your existing control module. You remove the control module cover, pop out the old circuit board and install the new circuit board. All the plugs that plugged into the old circuit board will plug into the new circuit board, making the installation a snap. There are two additional plugs on the new controller circuit card, A four pin plug ( NOT USED) and a three pin plug, used for the outside air temperature sensor.
You can re-install the control module at the same location as the original, or depending on wire lengths, relocate it to a more convenient location.
In the vast majority of installations we’ve seen, the answer is YES, your original 10k temperature sensors will work just fine.. However, on older motorhomes that used a very early version of the Intellitec controller, you’ll need to upgrade your original 2.2k sensors to the 10k versions, we include these in the kit. There are two types of temperature thermistors used; a 2.2k ohm (older) and a 10k ohm (newer.)
The older 2.2k ohm thermistors tend to be mounted flush to the wall. These were used with Intellitec controllers xx-xx3xx-xxx modules. These 2.2 k thermistors are not compatible. HOWEVER, we include two new temperature sensors (10k), housings, and connector plugs. The installer will need to swap these out as part of the upgrade.
Newer style Intellitec temperature sensors use a 10k ohm thermistor. The sensor housings protrude out from the wall by about 5/8 of an inch. These were used with Intellitec controllers xx-xx5xx-xxx and xx-xx8xx-xxx modules. These sensors are very responsive and accurate, and are compatible with the Waiter ECC system.
If you have a bad sensor, we offer these for sale. 2 each, 3D printed housing, connectors, sensors and wire nuts.

The Waiter ECC is plug and play, no electrical modifications are needed. Unplug the old system, plug in the new system, and you’re ready to go.
However, we recommend installing an ON / OFF switch in the 12 volt power that feeds the control module. The parts are included in the kit, an ON / OFF switch with wires attached, a switch mount plate, and two sets of lug connectors. Adding the switch takes about 5 minutes and allows the system to be turned ON / OFF without removing the 12 volt ECC fuse.
Details for doing this are included in the INSTALLATION MANUAL.
In most installations, the new touch screen will be mounted at the same location as the original Intellitec operator panel. The mounting hole that the touchscreen fits into usually needs to be made slightly taller, about 1/8 to 1/4 inches. We recommend waiting until you receive your kit so you can do a test fit before cutting.
If you’re mounting to a regular luan wall, consider using the optional wall mount plate to add strength and security for the touchscreen installation.
If your mounting to a large black control panel surface, you may benefit from mounting the touchscreen upside down, See this article.
Many USB power supplies (powering the touch screen through its USB connector) can not produce reliable current flow to the touch screens computer. When this happens, its operation can become unreliable, rebooting, crashing, etc.
We strongly suggest powering the touchscreen using a 12 volt source that also powers the control module through a common ON/OFF switch. In the ECC-NWR system, the original yellow and brown wires (original IPX com wires) are used to send 12 volts from the control module to the touch screen
Yes, Use good quality cable, CAT 5 or CAT 6 would be OK. When you cut the cable and re-splice it, make sure to connect the wires to the correct color (Red, Yellow, and Black).
In the vast majority of systems that we ship, we include an OAT sensor with a 15 ft cable. However, on rare occasions when we run into supply difficulties, we include a 10 ft instead of the 15 ft. Either cable could be lengthen by splicing in a longer cable. If the cable is to long, roll up the excess cable and stow it out of the way, there is no need to shorten it.
Waiter ECC is designed to be a direct plug and play replacement for your existing Intellitec ECC system. Unplug the old operator panel and control module, plug in the new control board and touchscreen, and you’re ready to go. Feedback from our customers tell us it took about 20 minutes to do the basic install (swap boards, install touchscreen, unit up and running). Routing and installing the external temperature sensor took about an hour.
Although no wiring changes are required, we highly recommend installing an ON/OFF switch near the control module to make it easier to remove power or reboot the system. (switch included in kit)
The touch screen is slightly larger than the old Intellitect operator panel, so in most installations, the wall opening will need to be made approximately 1/8 – 1/4 inch taller to accommodate the new touchscreen. A mount template is included or you can use an optional Wall Mount Plate to assist in marking the new opening size. Read through the INSTALLATION MANUAL to get an idea of what needs to be done.
Two main reasons, If you need to re-boot the system, or you’re in storage with power, but don’t need to run the heat or A/C.
1) If the ON/OFF switch isn’t installed, the only way to reboot the system is to either remove the 5 amp ECC fuse from the 12 volt fuse panel, or remove / re-install the 12 volt connector on the control module. We don’t like this option because of the risk of pulling wires out of the connector, shorting out the connector, installing the connector incorrectly, etc. Its just to high risk.
2) If you place your motorhome in storage yet keep shore power (i.e. keep the batteries charged) and there’s no need to run heat or A/C, then we prefer that you shut the Waiter ECC system OFF, this reduces wear and tear on the system and the touchscreen display.
The Waiter ECC kit comes with a switch, spade lug connectors, and a guarded wall mount switch plate. If you don’t want to mount the switch on a wall, another option is to simply use a couple wire ties and secure the switch to a wire bundle or somewhere that you can get to it.
YES / NO – To gain the full functionality of the Waiter ECC, yes, you need to install it. Feedback from users tell us that its sometimes a pain to route the cable and install the sensor, but its worth it in the end.
Without the OAT temperature, the furnace and A/C systems will function normally. However the “Freeze Protection” mode will not function correctly as it monitors the OAT temperature and switches on when the temperature drops below 35 degrees F.
If you choose not to install OAT sensor, we recommend at least plug it in, coil it up, and wire tie it out of the way. This way the system sees the sensor and won’t trigger a fault.
You can prevent the OAT temperature from displaying on the screen – On the CONFIG screen, set the OAT source to “0”. Turning off the OAT display works on touchscreen version 4.4.1 and higher.
Almost every installation is unique, so its impossible to give a definitive answer. There are three factors that may help you in deciding.
- In almost every case, the existing hole in the wall needs to be made about 1/4 inch taller for the touchscreen to properly recess inside the wall. If the touch screen jams in the hole, this is not a secure installation and the Velcro tape will not hold the touchscreen. The recess hole MUST allow the touchscreen to properly recess inside the wall regardless if you use the Wall Mount Plate or not.
- In very rare installations, the depth of the hollow wall just barely provides clearance when the touchscreen is recessed. In a normal installation, the rear of the touchscreen is recessed approximately 1 1/4 inch inside the wall. Using a Wall Mount plate it will recess about 1 inch.
- In some installations, the Velcro tape adhesive has pulled away from the wall covering. In these cases, the installer has created some type of frame to mount the touchscreen to. These are the installations that the Wall Mount Plate was developed, to ensure a surface that the Velcro tape can bond to.
WAITER ECC - OPERATION
Most motor-homes that use the Intellitec control system have “basement heat”. These are storage compartments below the floor that water pipes run through and are heated by a duct from the furnace. The compartments are poorly insulated and the only way they get any heat to them is when the furnace’s blower is running. This usually isn’t a problem when the motor-home is occupied because the thermostat is set high enough so the inside is warm and the compartments get enough warm air to prevent them from freezing. However, if the motor home isn’t occupied and the furnace is set real low, it may not be warm enough or cycle often enough to ensure the compartments stay above freezing.
The Waiter ECC has a unique feature called “freeze protection”. If the furnace is set to HEAT and the set point is placed at 40, the system now goes into a “Freeze Protection” mode and does two things:
1) It continues to monitor the inside temperature like it normally does and will cycle the furnace as needed to maintain at least 40 degrees inside the living area.
2) It monitors the outside temperature and if it drops below 35 degrees, the freeze protection mode is enabled. This mode monitors the furnace run time to ensure the furnace runs at least two minutes during any 30 minute interval. Example: if the set point is at 40 and the inside temperature stays above 40, the furnace would normally never turn run. However, with freeze mode, if the furnace hasn’t run in the last 30 minutes, freeze mode will turn the furnace on and run it for two minutes. This two minute run blows warm air down into the storage compartment to ensure they stay above freezing.
There are two “DIM” settings, one for DAY and one for NIGHT. After about 30 seconds of no touch on the screen, the screen will dim to either of these two settings. Normally, when the screen is touched, it goes to full brightness, As of version 4.7.2, a “NIGHT BRIGHT” level setting was added, If its night time, instead of going to full brightness, the screen will go to the NIGHT BRIGHT level.
There are two select-able ways of determining DAY and NITE: Sunrise/sunset (AUTO) or by a schedule (Specific time).
Sunrise/Sunset: When AUTO is selected, it uses the date being reported by the real time clock to compute estimated sunrise / sunset times for that date. For example, If the date is Feb 15th, the sunrise (SR) will be approximately 7:30 am and sundown (SD) will be approximately 6:07 pm. It then uses the current time to determine if it should dim DAY or NIGHT. If the time is between 15 minutes before SR and 60 minutes after SD , it uses the DAY dim setting. Otherwise it uses the NIGHT dim setting.
Schedule: – Specific Time: This is generally the more popular way. Specific times are set for DAY and NITE.
DIM setting ranges from 5 to 100. These are not linear, i.e. 10 isn’t twice as bright as 5. Also, every display responds differently to this setting. A dark room night DIM setting on one display may be 6, but on another display it may be 14. Change the setting by clicking on it, It increments up to “100”, then the next increment step will be “5”. Click SAVE to save your settings.
Waiters ECC method for A/C AUTO function behaves a little differently than the Intellitecs method.
In A/C AUTO, the A/C blower speed is automatically changed as the temperature changes. The normal blower speed is LO. The blower will switch to HI if the temperature is 4 degrees or more above the set point. When the temperature drops more than 1 degree below the set point, the compressor turns off, then about 30 seconds later, the blower will shut off.
When the temperature goes above the set point, the blower turns on LO, then after a 15 second delay, the compressor will start, if there is no SHEDing.
Most motorhomes that use these early model Intellitec ECC system have a shore power capacity of 30 amps. SHEDing is a way of preventing electrical loads inside the motorhome from exceeding 30 amps and tripping circuit breakers.
SHED is when the ECC detects a possible overload and shuts down one of the compressors to reduce the load. It SHEDs the load. The ECC monitors the 30 amp circuit, when it starts an A/C unit and compressor, if it sees that the current is exceeding about 28 amps, it’ll shut the compressor off again, this is called SHEDing.
How Waiter ECC performs SHEDing:
Before commanding a compressor to start, Waiters ECC does what we call a Pre-SHED check to determine if starting the compressor might cause an overload. If it appears like it would, then starting is delayed until the amps being drawn is reduced enough to allow the compressor to be started.
If the compressor is started, if the amps exceed about 28 at any time, the compressor is shut off, SHEDed. When this happens, the compressor cannot be restarted until a hard start delay (2 minutes) has elapsed. This “hard start delay” allows the head pressure in the compressor to bleed down, making it easier to start the compressor..
What is Pre-SHED? – In the CONFIG screen, the approximate BTU ratings of each A/C unit is selected. Waiters ECC uses this to estimate how much current the compressor will draw when its started. Before starting the compressor, it adds the estimated amps to the amps the motor-home is currently drawing, if this exceeds about 28 amps, the compressor will not be started.
SHED is displayed on the operators touch screen as a red square in the upper right corner of the small window.
Pre-SHED is displayed as an alternating rec/green square.
The Waiter ECC utilizes its own Real Time Clock (RTC) module to keep track of time. Most installations are mobile, crossing time zones, passing in-to and out-of time zones, daylight savings times, etc. Since we can’t depend on an internet connection or other convenient way to account for the vast number of possibilities, we decided to leave it up to the operator to set the correct date/time.
The RTC module is located on the controller circuit card and reports current time to the MQTT server once a minute. The RTC has a battery backup so it keeps time even when no power is applied. The battery is good for 5-6 years and is easy to replace.
This little box is a convenient reminder that you have a schedule running for either the FRONT or REAR system.
When you have a schedule (click on the SCHED tab) activated and running, the little gray square will illuminate in the lower left corner of the FRONT and/or REAR temperature displays.
This feature was introduced as of version 4.3.0. When selected, it controls both the furnace and the A/C unit at the same time. The HEAT and A/C set points are set individually by using the regular HEAT and A/C modes. The set points must be at least 5 degrees apart in order to select the HEAT – A/C mode. Once selected, the furnace kicks on if the temperature drops below the HEAT set point, and the A/C unit kicks on if the temperature goes above the A/C set point. The A/C unit operates exactly the same as if it was in A/C AUTO mode, the blower changes speed automatically and turns off about 30 seconds after the compressor kicks off.
You can change both set points at the same time by using the UP and DOWN buttons.
WAITER ECC - TROUBLE SHOOTING
The touchscreen is a low power WiFi access point for the Waiter ECC system components. The control module connects to this access point and they talk back and forth sharing information and control signals. On rare occasion, this connection can be lost, but in most cases, the connection is automatically restored.
The most common reason for losing connection is another wireless router or access point has been installed in the motor-home in very close proximity to the Waiter ECC touchscreen or control module. Normally, the Waiter ECC Wifi and your routers Wifi don’t interfere with each other, however, if they’re to close to each other, the routers transmitter can overpower and swamp the receiver in the Waiter ECC system.
If you’re experiencing LOST CONNECTION, move your Wifi router / access point as far away from the Waiter ECC touchscreen / control module as possible. In almost every case, this resolves the problem.
If the Control Module loses connection with the touch screen, its should re-establish the WiFi connection within 90 seconds. On rare occasion, the operator panel may not be able to reconnect. If this happens, reboot both the operator panel and the control module.
We highly recommend that both units be powered by the same 12 volt circuit, through the same ON/OFF switch.
The most common cause for losing connection is interference from a nearby wireless router or Wifi access point. Relocate your access point or router as far as possible from the Waiter ECC touchscreen and control module.
On occasion, the computer gets confused when it first boots up in a new area, so it’ll show the default Linux desktop screen instead of the Waiter ECC screen. This seems to happen if the unit has been powered down for any length of time or if its in a new WiFi environment where its scanning for WiFi networks and sees different networks.
Simply turn the power off for about 5 seconds then turn the power back on to force it to reboot again. This normally resolves the problem.
Contact us, we may be able to help walk you through a troubleshooting process, even if you’re still operating with the original Intellitec system. We often tell potential customers that the Waiter ECC system will not repair a faulty A/C unit.
Verify that you have 110 Volts to the A/C units, coach breakers, pedestal breakers, generator breakers, etc.
Do the blowers run if placed in FAN HI or FAN LO?
Verify the 120 volt circuit breakers in the motorhome are not popped (turn them off, then back on again)
If on shore power, verify the pedestal breaker isn’t popped. Do other appliances work.
If on generator power, verify that both 120 breakers on the generator or not popped.
If its just one A/C unit that doesn’t run but the other is OK, you can swap the FRONT / REAR plugs on the control module to see if the problem stays with the same unit. Don’t forget to switch them back.
The touchscreen operator panel should boot directly into the WaiterECC application without the user needing to enter anything.
However, on occasion, we’ve seen where the computer will get redirected and ask for the users password. If this happens, simply turn the unit OFF, wait five seconds, then turn it back on again. This will re-boot the computer and should resolve this problem.
If this doesn’t resolve the problem, contact us.
The blue LED illuminates when the controller isn’t reading one of the temperature sensors. This is more common during initial installation when the installer hasn’t yet configured the temperature sensors. The default configuration for the temperature source is 1 4 4. OAT = 1 (the electronic sensor), FRONT = 4 (the OEM thermistor plugged into touchscreen), and REAR = 4 (the OEM thermistor plugged into touchscreen)
If the OEM sensors are plugged into the 4 pin connector on the controller board (early versions of the Waiter ECC) then the configuration would be 1 0 0 . (0 says the OEM sensors are plugged into the contole board instead of the touchscreen.
If electronic sensors are used for the internal temperature sensors, then the addresses will need to be determined by trial and error. See the TECHNICAL MANUAL for how to determine the addresses.
If the configuration is correct yet the blue LED is lite, the faulty sensor should be displaying a “-99” on the temperature readout.
YES. As of version 4.3.0, you can tell the system to mark the FRONT or REAR sensor as bad and use the good sensor to control both the FRONT and the REAR units. To mark a sensor as BAD, go to the CONFIG screen, change bad sensors TEMP SOURCE setting to 99. The display for the temperature will change to a reddish color to remind you that the sensor was marked bad and the display will now show the temperature for the good sensor. We have new sensor kits available on our web site, CLICK HERE.
The original Intellitec temperature sensors (10k thermistor) are accurate and fairly reliable, however, we’ve seen where they do go bad. If either the FRONT or REAR temperature is showing a reading that’s way off or is displaying a -99. That sensor is probably bad. Look at the sensor, sometimes its a simple task of re-soldering the sensor element or even a broken wire. You can verify the sensor fault by switching the FRONT and REAR plugs on the back of the touchscreen. If you swap the plugs, give it a minute to update the temperature. The software has a built in delay if it thinks it seeing a faulty sensor.
If you have an OHM meter, you can check the resistance of the sensor. Unplug the sensors, the FRONT and REAR should read about the same. At 77Deg F, the resistance should be 10k ohms. You can DOWNLOAD a chart that shows the resistance to temperature.
When the display shows -99, this is an indication that there’s an error reading the temperature sensor.
Verify the configuration screen didn’t get changed. Specifically, look at the “TEMP SOURCE” settings. On very early model Waiter ECCs that have the FRONT and REAR sensors plugged into the control module, the “TEMP SOURCE” should be set at “1 0 0”. All newer Plug and Play versions that have the temp sensors plugged into the back of the touchscreen, the “TEMP SOURCE” should be set at “1 4 4”.
If its only one of the temperatures that display the -99, consider a bad sensor or broken wire. If its the FRONT or REAR, swap the plugs on the back of the touchscreen to see if the problem changes from front to rear.
If its the outside temperature, try resetting the three pin plug on the control module, visually inspect the sensor prob for damage.
If this is a new installation, then odds are very good you have the wrong kit. Older versions of the Intellitec ECC (Part numbers 00-003XX-XXX) used a 2.2k thermistor for the temperature sensor. Later models (part numbers 00-005XX-XXX and 00-008XX-XXX) and the Waiter ECC use a 10k thermistor temperature sensor. If the older sensors are installed, this will cause the readings to be abnormally high, i.e. 130 degrees instead of 70 degrees.
If you order the upgrade kit for the older version, we include new temperature sensors and connectors in the kit.
Contact us to verify the type system you have and to order the correct thermistor sensors.